My Visual Studio Code Python Setup
Wednesday, September 8, 2021 - 8:52PM
I have been using Visual Studio Code for a while now, and I have found that it is a great tool for my development. Because of the converstaions I have had with many new programmers, I wanted to show my setup for python in hopes that it will be useful to others. That, and it will make for a good first (actual) post.
Requirements
It is here that I should note that these instructions are for macOS using python 3.9+.
Start with the basics:
We’ll need a copy of the application: Visual Studio Code.
Follow the recommended installation instructions for your operating system.
We’ll also, obviously, need python 3.9+ installed. There are a couple of options here. For any OS, we can use the official Python installer. For Mac, if you have it installed, you can use the Homebrew package manager.
Visual Studio Code and Python
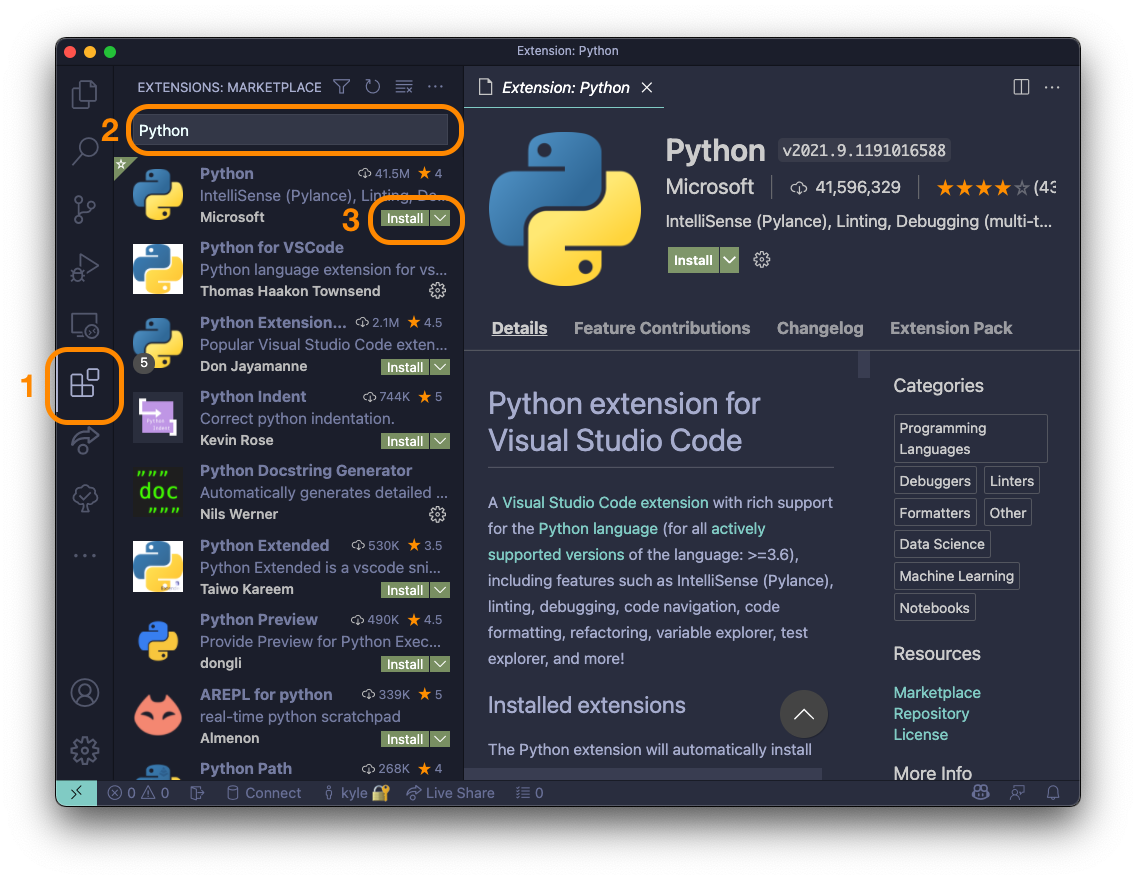
Since we will be running python within Visual Studio Code, we need to install the Python extension.

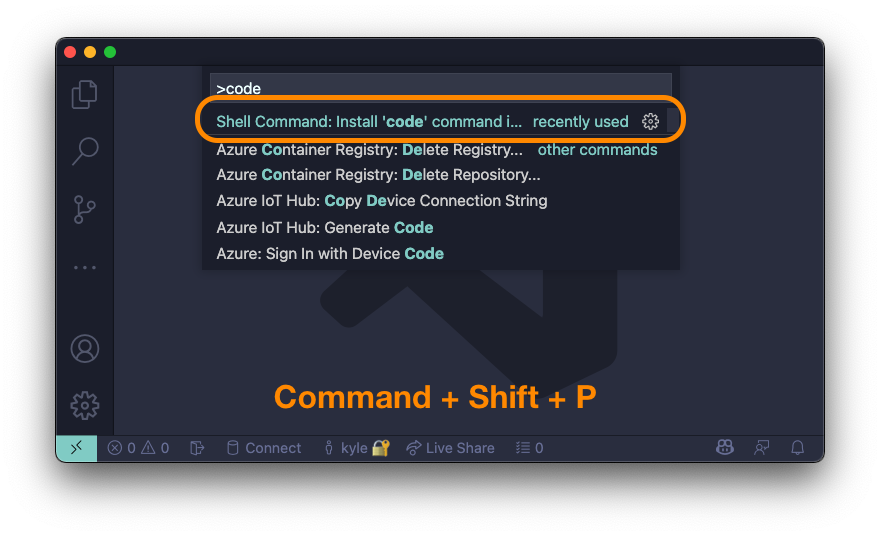
If you are even a casual terminal or powershell user, lets also install the code command line tool.

This will allow us to open files and folders from the command line.
Virtual Environments
For every project, we need a virtual environment. This is a folder that contains a copy of the python interpreter that is used to run the project. This is a good way to isolate the project from the rest of the system. To facilitate this, we can use the virtualenv package. However, I personally use and recommend using Pipenv. Pipenv is a wrapper around Pip, and it is a good way to manage dependencies for your project. Easiest way to install Pipenv is to use the Pip package manager that come built-in with your new python installation.
$ python3 -m pip install pipenv
This should install Pipenv globally.
Starting a new Python project
That should be everything we need to get started. Now, let’s get to the good stuff.
Let’s start by creating a new project. I’ll be using terminal but the steps are the same if you want to use powershell.
First step is creating a new folder and then navigating to it.
$ mkdir my-python-project && cd my-python-project
Next, we need to create a virtual environment. I like to manually create both the virtual environment folder as well as the requirements file for Pipenv.
$ mkdir .venv
$ touch Pipfile
$ pipenv install --python 3.9 --dev autopep8 pylint
A bit of an explaination on the options we passed to pipenv above:
install- installs the dependencies listed in the requirements file. (empty because we just created it)
--python- specifies the python version we want to use. In this case, we are using python 3.9.
--dev- installs the dependencies listed as dev dependencies.
autopep8andpylint- are the dependencies we want to install. These are the tools we will use to format our code.
Now, lets jump into Visual Studio Code. Easiest way is to use the code command we installed earlier.
$ code .
If you opted to not install the command, you can just open Visual Studio Code and navigate to the folder we created.
Configure Visual Studio Code for Python Development
Now that we have a project, we need to configure Visual Studio Code for Python development. This is done by creating a settings file. But first, let’s create a simple folder structure.
.vscode
    launch.json
src/
    __init__.py
    __main__.py
    main.py
This is just to get us Started. We will be using the src folder for our code. The __init__.py file will to make sure that the src folder is a python package. __main__.py is a file that will be executed when the project is run. main.py is the primary source file to run our code.
The following should be the contents of the launch.json file:
{
  // Use IntelliSense to learn about possible attributes.
  // Hover to view descriptions of existing attributes.
  // For more information, visit: https://go.microsoft.com/fwlink/?linkid=830387
  "version": "0.2.0",
  "configurations": [
    {
      "name": "Python: Module",
      "type": "python",
      "request": "launch",
      "module": "src"
    }
  ]
}
This is the configuration we will use to launch our project. Generally, this file can be managed and modified by VSCode but we are going to just create it manually. The module attribute is the folder we want to run our code from.
Running our code
The goundwork has been laid so let’s finally populate our newly create project with some very simple code and then take it for a test run. Put the following in the main.py file:
import time


class SimpleApp:
    def run(self):
        print('Running...')
        for _ in range(5):
            time.sleep(1)
            print('Tick')
And in the __main__.py file:
from src.main import SimpleApp

app = SimpleApp()
app.run()
Once these files are populated, we can run our code. The default run hotkey for running our code is F5. Hit it and we should see our code running.
Running...
Tick
Tick
Tick
Tick
Tick
That’s it! We have a simple python project all setup for development and debugging.
Final Thoughts
The whole purpose of this post is to try to get a new python developer up and running with a few, mostly simple, freely available tools. That said, this is by no means the only way to do things. This is just the workflow that I have settled into and have found to be the most efficient and simple way to get things done.